Master Guitar Chords
A Complete Beginner’s Guide to Unlocking Your Musical Potential
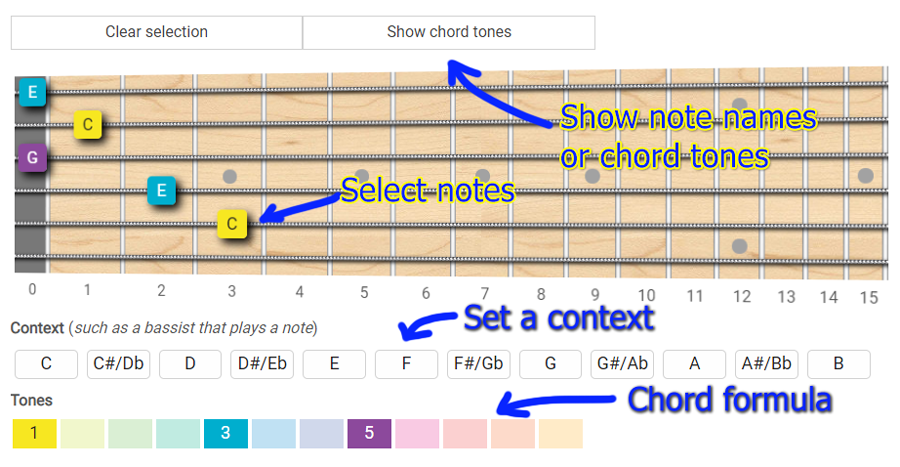
Play with the interactive fretboard with the 10 most important chords to learn first.
This page will guide you through everything you need to know about guitar chords, from beginner to advanced levels.
We'll start with the most common chord shapes for beginners, progress to intermediate fingerings, and eventually dive into chord theory to understand how to create any chord across the entire fretboard.
You'll also find a comprehensive chord library with various voicings, an interactive chord generator, and my complete ebook Chords Domination | Play Any Chord You Want Across All The Fretboard.
Let's get started!
Guitar Chord Types
Below is a table that covers all guitar chords: minor, major, dominant, augmented, suspended, diminished, extended, altered, and more.
It shows the correct finger placements for each chord, the notes that make up the chord, and the intervals within the chord.
Click on any chord name to see all possible variations and fingerings:
How To Read Chord Diagrams
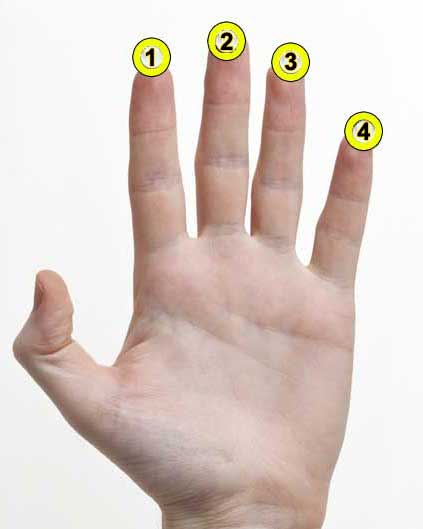
Let's use the A chord as an example to show you how to read chord diagrams. In chord diagrams, your left-hand fingers are numbered as follows:
As you will notice:
- The index finger is labeled 1
- The middle finger is labeled 2
- The ring finger is labeled 3
- The pinky finger is labeled 4
These numbers on the diagrams tell you which fingers to use to press the frets for the chords.
Chord Diagrams
Example: A Major chord
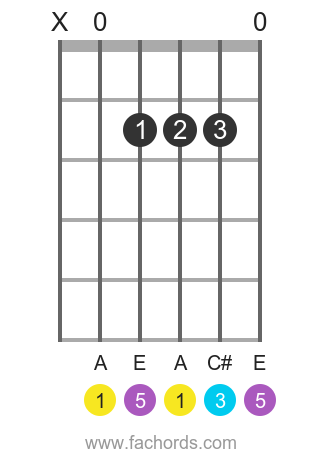
The diagram shows the guitar fretboard, with the thickest string on the left and the high E string on the right.
The numbers on the frets indicate where to press the strings. At the top of the diagram, you'll see an X or a 0 above certain strings.
The X means you should mute the string (do not play it), and the 0 means you should play the string open, without pressing any frets. To play the A chord as shown in the diagram:
- Do not play the low E string (indicated by the X above the string)
- Play the 5th string (A string) open, without pressing any fret (see the 0 above the A string?)
- Press the 2nd fret of the 4th string (D string) with your index finger
- Press the 2nd fret of the 3rd string (G string) with your middle finger
- Press the 2nd fret of the 2nd string (B string) with your ring finger
- Let the 1st string (high E string) ring open, without pressing any fret
Drill Down: Check out the complete tutorial on how to read chord diagrams with instructions on intervals and chord structures.
Beginner Guitar Chords
Here are the chord diagrams with basic instructions for playing the most essential chords that beginners should learn first.
Take your time to learn these shapes; it may take some practice to play them smoothly if you're just starting out.
C Major Chord
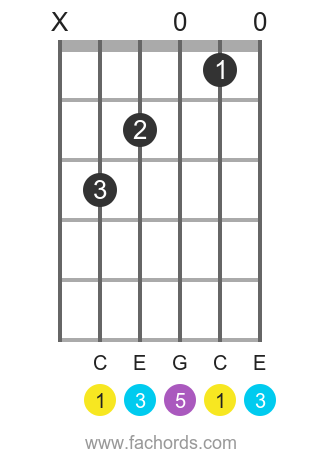
This is the most common way to play the C major chord on the guitar.
Be careful not to play the low E string.
How to play the C major chord:
- Mute the low E string
- Let the G string ring open
- Let the high E string ring open
- Place your index finger (1) on the 1st fret of the B string
- Place your middle finger (2) on the 2nd fret of the D string
- Place your ring finger (3) on the 3rd fret of the A string
C Major (Super Easy)
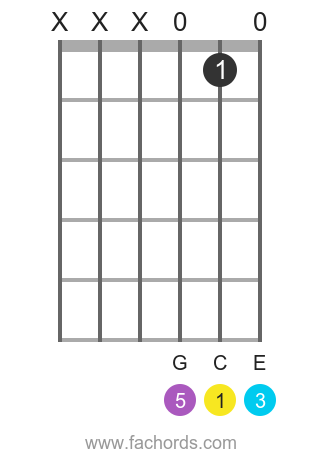
This is an easier version of the C major chord, using only three strings and your index finger.
To play this super easy version of the C major chord:
- Mute the low E, A, and D strings
- Let the G string ring open
- Let the high E string ring open
- Place your index finger (1) on the 1st fret of the B string
A Major Chord On Guitar

To play the basic A major chord, use your index, middle, and ring fingers.
- Mute the low E string
- Let the A string ring open
- Let the high E string ring open
- Place your index finger (1) on the 2nd fret of the D string
- Place your middle finger (2) on the 2nd fret of the G string
- Place your ring finger (3) on the 2nd fret of the B string
G Major Chord
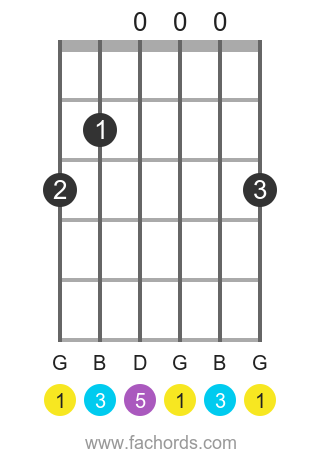
This is the most common fingering for the G major chord.
- Let the D string ring open
- Let the G string ring open
- Let the B string ring open
- Place your index finger (1) on the 2nd fret of the A string
- Place your middle finger (2) on the 3rd fret of the low E string
- Place your ring finger (3) on the 3rd fret of the high E string
G Major (Super Easy)
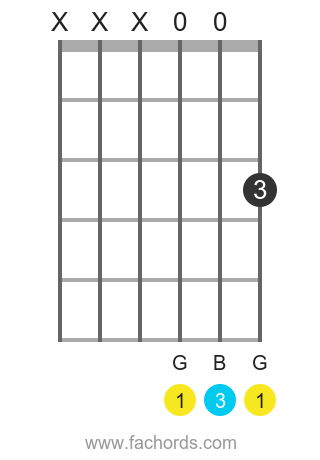
This simpler version of the G major chord uses only one finger.
- Mute the low E, A, and D strings
- Let the G string ring open
- Let the B string ring open
- Place your ring finger (3) on the 3rd fret of the high E string
E Major Chord On Guitar
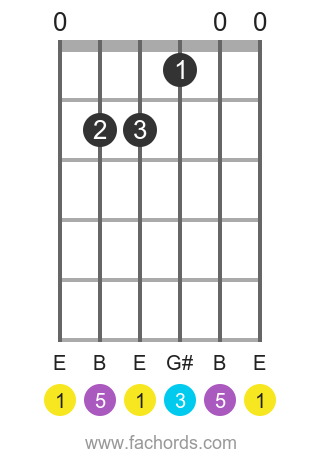
For the E major chord, you should strum all the strings.
- Let the low E string ring open
- Let the B string ring open
- Let the high E string ring open
- Place your index finger (1) on the 1st fret of the G string
- Place your middle finger (2) on the 2nd fret of the A string
- Place your ring finger (3) on the 2nd fret of the D string
E Major (Super Easy)
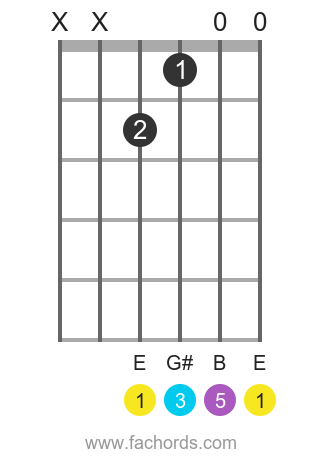
This simplified version of the E major chord only requires two fingers.
- Mute the low E and A strings
- Let the B string ring open
- Let the high E string ring open
- Place your index finger (1) on the 1st fret of the G string
- Place your middle finger (2) on the 2nd fret of the D string
How To Play D Major on Guitar
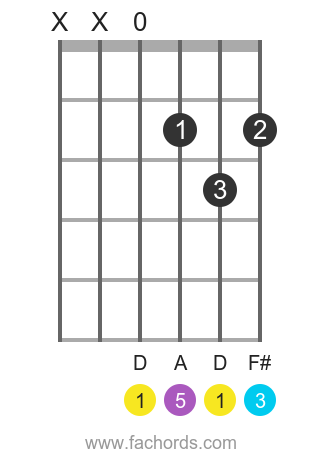
This is the standard way to play the D major chord on the guitar.
- Mute the low E and A strings
- Let the D string ring open
- Place your index finger (1) on the 2nd fret of the G string
- Place your middle finger (2) on the 2nd fret of the high E string
- Place your ring finger (3) on the 3rd fret of the B string
A Minor Chord
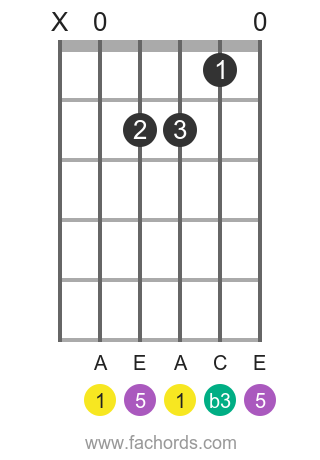
The A minor chord is another fundamental chord often found in ballads and melancholic songs.
- Mute the low E string
- Let the A string ring open
- Let the high E string ring open
- Place your index finger (1) on the 1st fret of the B string
- Place your middle finger (2) on the 2nd fret of the D string
- Place your ring finger (3) on the 2nd fret of the G string
A Minor (Super Easy)
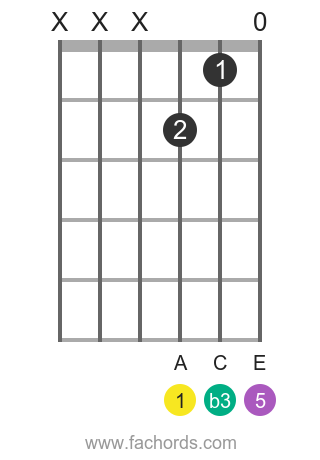
Here's a simpler version of the A minor chord.
- Mute the low E, A, and D strings
- Let the high E string ring open
- Place your index finger (1) on the 1st fret of the B string
- Place your middle finger (2) on the 2nd fret of the G string
E Minor Chord
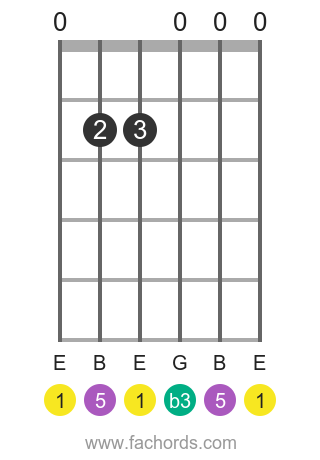
The E minor chord is very straightforward and requires only two fingers.
- Let the low E string ring open
- Let the G string ring open
- Let the B string ring open
- Let the high E string ring open
- Place your middle finger (2) on the 2nd fret of the A string
- Place your ring finger (3) on the 2nd fret of the D string
E Minor (Super Easy)
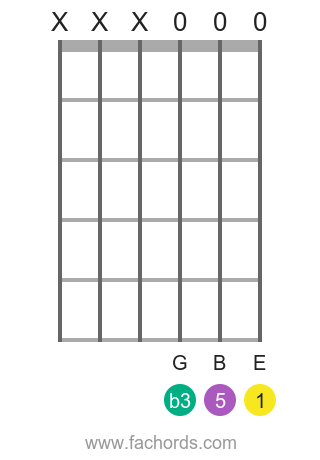
Believe it or not, this E minor chord shape doesn't require pressing any frets. If you've ever tried playing "Nothing Else Matters" by Metallica, the first few bars use only open strings.
- Mute the low E, A, and D strings
- Let the G, B, and high E strings ring open
D Minor Chord
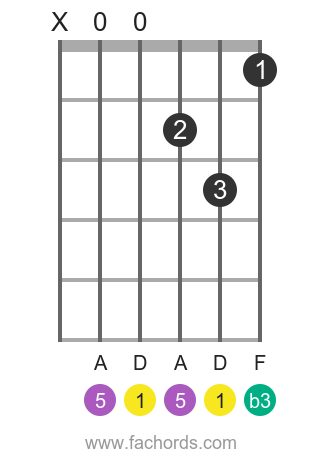
This is the final basic chord covered in this tutorial.
- Mute the low E and A strings
- Let the D string ring open
- Place your index finger (1) on the 1st fret of the high E string
- Place your middle finger (2) on the 2nd fret of the G string
- Place your ring finger (3) on the 3rd fret of the B string
Tips for Beginners: How To Practice Your First Chords
Here are some tips for practicing chords:
- Press the strings with the tips of your fingers (it might hurt at first, but calluses will develop over time)
- Place your fingers close to the metal frets
- Your fingertips should be perpendicular to the fretboard to avoid touching other strings
- Play each string of the chord individually to ensure each note sounds clear
- Press the strings just enough to make the notes ring clearly—no more, no less
- Practice switching between two chords, then move on to three and four chords
A Note About Open Chords
 Open chords make use of
open strings as much as possible.
They are easier to play because they require fewer frets to be pressed. Beginners usually start by learning major and minor open chords.
A basic major chord consists of the root note, the 3rd, and the 5th. For example, a G chord is made up of the notes G, B, and D. A minor chord, on the other hand, consists of the root, minor 3rd, and 5th, so a G minor chord is G, Bb, and D.
Drill Down: Check out the first open guitar chords that a beginner should learn.
Power Chords
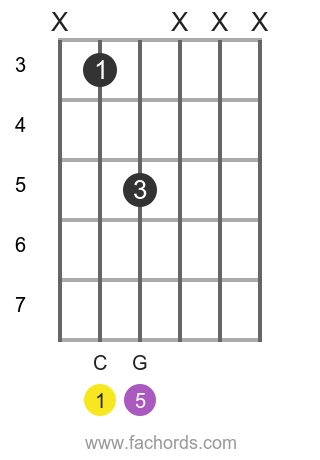 Power chords
are an excellent starting point for beginners and are commonly used in rock and blues. Technically, they aren't chords but dyads meaning two notes played together.
A power chord is made up of only the root and the fifth. For instance, a G power chord consists of the notes G and D.
Power chords are typically played on the three lowest strings of the electric guitar (low E, A, and D), often ignoring the higher strings.
Drill Down: Jump to the complete power chords tutorial to learn more.
Intermediate Guitar Chords
We've compiled a list of 15 intermediate guitar chords you should learn to play more complex chords.
After that, it's time to tackle...
Bar Chords
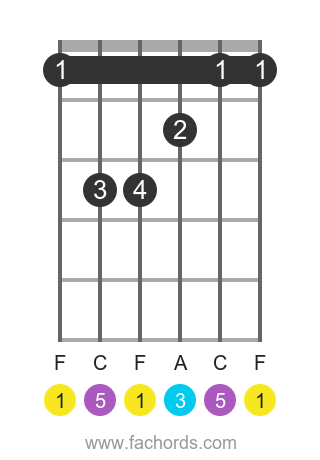 Bar chords require pressing
multiple frets with a single finger.
They can be challenging initially, especially when you lack finger strength.
The great thing about bar chords is that they are movable: you can shift the same shape up or down the fretboard to play any chord.
You can play full bar chords, like the F major chord (with all six strings pressed by the index finger), or partial bar chords.
Drill Down: 7 Tips To Make Bar Chords Easier. Bar chords can be tough for beginners, but this guide provides tips to make them easier to master.
Dominant Chords
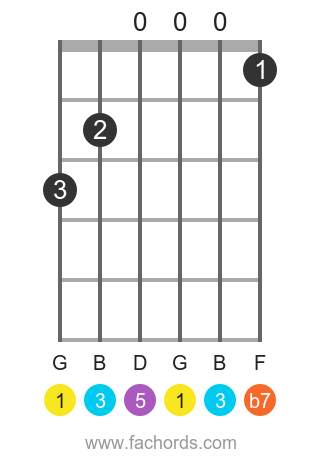 Dominant chords are major chords with
a minor seventh, making them a type of four-tone chord.
For example, the G dominant chord consists of the G major chord (G, B, and D) plus F, which is the seventh of G.
Dominant chords play a crucial role in chord progressions by introducing tension that resolves to the home chord.
Drill Down: Learn more about 7th dominant chords and their extended forms, such as the Ninth chord.
Diminished Chords
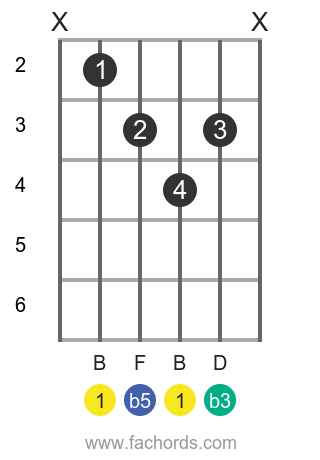 Diminished chords are used to
create dissonance and tension, often resolving to more stable chords.
There are three main types of diminished chords:
- Diminished triad (1, b3, b5)
- Half diminished chord (1, b3, b5, b7)
- Diminished 7th chord (1, b3, b5, bb7)
Drill Down: Learn all about diminished chords.
Suspended Chords
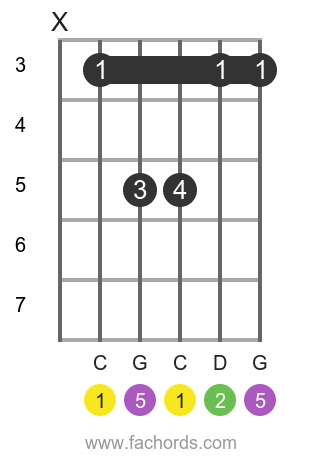 Suspended chords are unique
because they are neither major nor minor.
They are often used to create tension and can be a powerful tool in songwriting.
Suspended chords come in two varieties: sus2 (1, 2, 5) and sus4 (1, 4, 5).
Drill Down: Learn more about suspended chords for guitar.
Sixth Chords
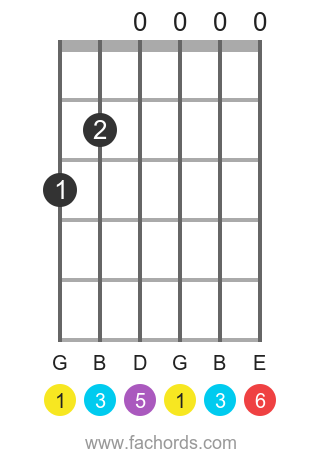 To add a laid-back and relaxed feel to
your music, consider using the 6th chord.
A sixth chord is a major chord with a major sixth added: 1, 3, 5, and 6 (G, B, D, and E in the case of G6).
Drill Down: Learn more about 6th chord construction and applications.
Advanced Guitar Chords
If you've been studying guitar chords for a while, you know that chords are more than just static shapes to memorize. You can assemble intervals on the fly to create chords of all qualities across the entire fretboard.
This C variations tutorial is excellent for understanding the different types of chords that emerge depending on the intervals used.
A great way to deepen your chord knowledge is to view the fretboard as a whole, and try to spot all possible combinations of tones that create a specific chord quality.
Be sure to include all inversions.
For instance, try forming as many C maj7 chords as possible using the map below. A C maj7 consists of the root, 3rd, 5th, and 7th.
Often, you can drop the 5th because it doesn't add much harmonic richness, as in shell chord shapes.
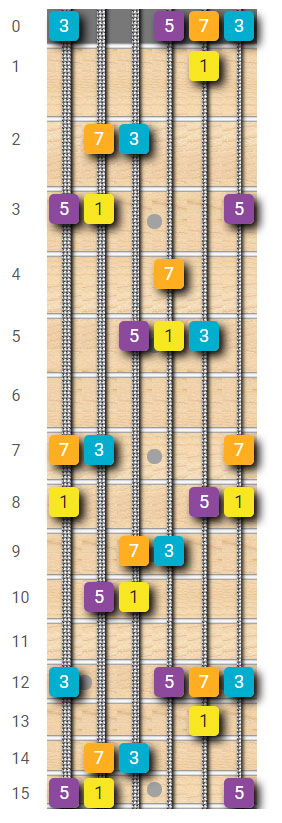
Drill Down: Experiment with new chord shapes using my chord generator tool.
Guitar Chords: More Tips And Tricks
Finger Positions Are Just Suggestions!
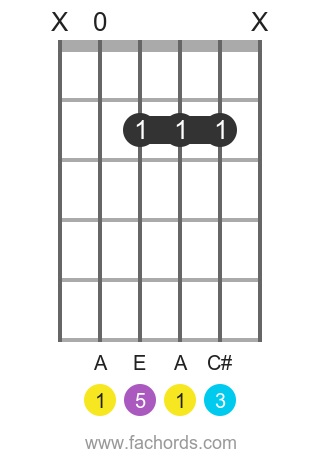
A Major chord with bar fingering
 Sometimes,
you'll find chord diagrams that don't specify which fingers to use.
This is because different people sometimes play chords differently.
Some people can't play an A chord in the standard way because their fingers are too large, making the standard fingering too cramped.
Instead, they might play the A chord with a mini-barre, using one finger to press down multiple frets.
For example, I could bar my index finger across the 4th and 3rd strings at the second fret, then place my middle finger on the 2nd string, second fret (as shown in the image).
This gives me more space between the frets and frees up my ring and pinky fingers to play melodies and bass notes. It's all about personal preference—play the chord in the way that feels most comfortable for you.
Some shapes work better for certain techniques, such as flat-picking, fingerstyle, and other applications.
At the bottom of the diagrams, you can see the names of the notes on each string, along with some colorful circles.
The letters inside the circles indicate the intervals in the chord (root, major third, minor third, etc.).
The colors change based on the type of interval. For example, the root is always yellow.
Intervals are an intermediate topic that belongs to chord theory. You can enjoy this complete tutorial on chord construction.
Drill Down: Did you come up with a shape that sounds great, but you're not sure what to call it? My guitar chord analyzer can help you figure out any chord you create.
How To Build Guitar Chords
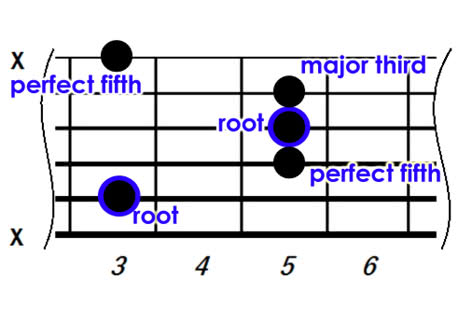
You might be wondering how all these chord shapes are constructed.
For now, just know that a chord is based on the notes of a simple scale with seven notes, ending on the original note one octave up, for a total of eight notes.
A chord is three or more notes played simultaneously at specific intervals (remember, an interval is a note in a scale) that work together to create the desired sound.
One of the reasons guitars (and pianos) are so popular is that they are multi-timbral instruments, meaning they can play more than one note simultaneously.
A basic major chord is made up of the 1st note in the scale of the key you're playing in (the root note), the 3rd note, and the 5th note.
Woodwinds, brass, and similar instruments can only play one note at a time. To form a chord, they need at least three players, each playing a single note of the chord at the same time.
Drill Down: To learn the foundational theory of chord building so you can create your own shapes, check out our guitar music theory tutorial.
How Many Chords Should I Learn?
Theoretically, there are unlimited possible chords.
You can start with open chords and move them up the fretboard to discover hundreds of different shapes.
In practice, you can get by for quite a while with around 30 chords in your repertoire, or even fewer, depending on the type of music you want to play.
There are bluegrass guitar players who have gone through their entire careers playing only a dozen or so chords.
Many guitarists are also used to transposing songs to more familiar keys, often with the help of a guitar capo.
If you're interested in delving deeper into music theory and learning how to construct chords by combining intervals all along the fretboard, check out my chord construction tutorial and my complete ebook Chords Domination | Play Any Chord You Want Across All The Fretboard.
Now you should have a solid understanding of what it takes to master chords. Take your time to practice and internalize these concepts.
To stay updated on new tutorials, subscribe to the free newsletter (you'll also get access to the download area with lots of free printable resources).
