Fretboard Navigation Choices: Left or Right?
Seeing Two Chord Shapes as a Whole Chunk
In this tutorial, I want to introduce a new way of thinking when it comes to learning guitar shapes (chords and scales).
Suppose you want to play an E7 chord in the middle of the fretboard, placing the root of the chord on the 7th fret of the A string.
A question you might ask yourself is:
Am I going left or right? In other words, will I go up or down the fretboard?

There are at least two different fingerings that share some frets: one extends to the left side of the fretboard, and the other to the right.
Take a look at the image below. You can see that the two shapes share notes on the 7th fret (B, D, and E).

The Benefits of Knowing Multiple Fingerings
This is a simple concept, in some ways similar to the CAGED system, but seeing these two possible options as a whole chunk helps you navigate the fretboard more effectively.
In fact, knowing multiple fingerings for the same chord can be useful for several reasons:
- It gives you more options when playing through a chord progression. Depending on the specific chords and the position of your left hand, one fingering may be more comfortable or easier to play than another.
- It helps you voice chords in different ways. For example, using a fingering that extends to the left of the fretboard may allow you to use more open strings, giving the chord a different sound compared to a fingering closer to the middle of the neck.
- It provides more flexibility when soloing. If you are improvising over a chord progression, having multiple fingerings for the chords can allow you to play with more fluidity and move more easily between chords.
Overall, the ability to play the same chords in multiple positions on the fretboard is a valuable skill for any guitar player. It can help you create a more musical and expressive performance.
Important suggestion: When you learn a chord, always try to learn its two versions—left and right—and consider them as a whole shape!
Some Examples
Below, I'll show you some examples of the main chord types. Of course, this is just a subset of all the possibilities.
Be sure to experiment with other chord qualities and root positions. For this purpose, you might find our complete fretboard tone maps and my chord identifier tool useful.
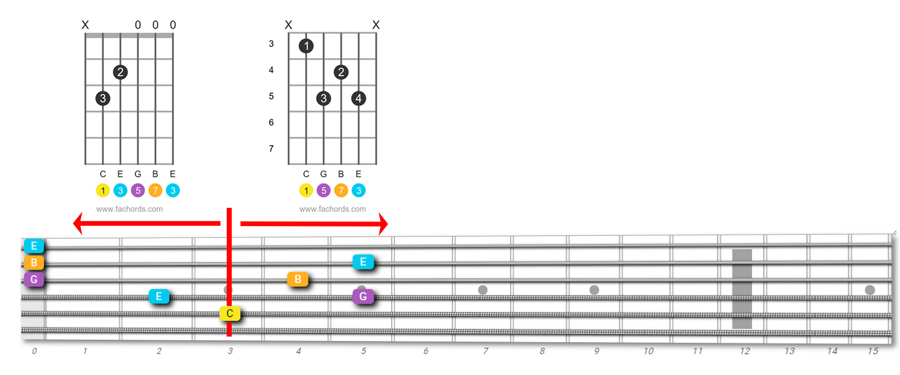
C maj7
In these two versions of the Cmaj7 chord, you can clearly see how you can exploit open strings if you move to the left.

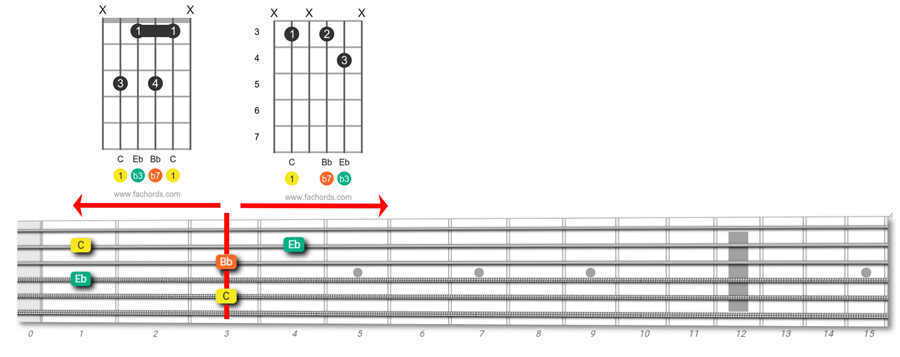
C min7
Here are the two shapes for the Cmin7 chord. Notice how you can avoid the barre shape by using the version on the right.

How to Practice This Concept
A great way to practice the concepts in this tutorial is to choose a specific area of the fretboard to focus on—5 frets wide—and play a chord progression in all the keys.
For example, let's use the 2-5-1 jazz chord progression.
Choose a key and determine the chords for the 2-5-1 progression in that key.
For example, in the key of C, the 2-5-1 progression would be Dm7-G7-Cmaj7.
Practice playing through the progression using only the notes within the chosen area of the fretboard.
Repeat the process for all the keys.
This will force you to use either the "left version" or the "right version" of a chord.
You may need to experiment with different fingerings and inversions to find the best fit for the given constraints.
This exercise can help you develop your chord vocabulary and improvisation skills while also encouraging creative thinking and working within specific musical constraints.
It can also help you become more familiar with the layout of the fretboard and improve your finger dexterity.
Find detailed instructions about this exercise in my Jazz progression workout tutorial.
Does This System Work for Scales Too?
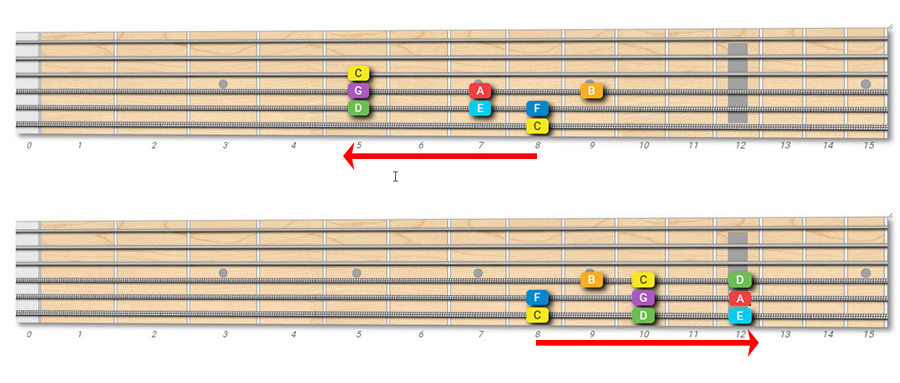
Yes, absolutely! In this case, the pattern will depend on which finger you're going to use to play the first note of the scale:

The first pattern uses the pinkie on the root C (low E string, 8th fret), while the second pattern uses the index finger on the same note.
You have many options when playing guitar scales and arpeggios (4-note boxes, 3 notes per string, diagonal patterns, and more). Learn more about scale fingerings here.
Going Left or Right: Conclusions
Okay, this quick and easy tutorial has come to an end. The final aim is still the same: to give you a holistic view of the fretboard, free you from fixed shapes and patterns, and, ultimately, help you express yourself better on the instrument.
To stay updated, please subscribe here.