Lead Guitar | Beginner Guide
Step-by-step Plan and Exercises to Learn Solo Guitar

Now before we even get started with these lead guitar lessons I’d like to make one thing clear: following this tutorial alone isn’t going to make you an incredible guitarist.
That’s a journey that’s impossible to fit into 7000 words.
Instead what I’m going to try to do with this lesson is to give you a thorough understanding of what it takes to become fluid as a solo guitarist and to also help you learn how to play lead guitar , building a solid foundation of scales , playing cool blues licks, twin guitar lines, and techniques that you can base your guitar playing ambitions on.
Remember, when it comes to the guitar, it’s far more difficult to unlearn bad technique and bad habits than it is to learn new ones .
So I hope that you pay attention and work hard on mastering the lead guitar knowledge that I’m about to share with you.
So let’s get started.
5 essential skills to play a great guitar solo
Before we start, I’d like to take a minute to talk about what I believe are the five cornerstones of learning to play great guitar solos:
1 - Your physical playing ability
Let’s keep it real; you could know a thousand different scales , a few dozen arpeggio patterns and a whole bunch of cool techniques, but they won’t mean jack shit if you don’t have the actual physical playing ability to incorporate them into your solos.
This is why it’s important that you incorporate a daily practice routine that focuses on developing your finger strength, dexterity and speed of both your fretting hand and your strumming hand.
2 - Your theoretical knowledge
This is your knowledge of chords, scales , modes, arpeggios and so on and so forth.
Without this knowledge, you’ll be as restricted as a painter with only a few brushes to choose from.
3 - Your technical knowledge
This is your knowledge of various techniques used in guitar soloing like string bending, hammer-ons and pull-offs .
Without a robust repertoire of techniques to employ, your solos can end up sounding monotonous or one-dimensional.
4 - Your playing dynamics
This is the actual way in which you play the notes that make up your solo.
For example you might decide to play a section of the notes softly while playing others more aggressively.
5 - Your melodic sensibility
This is your melodic fingerprint that you will develop over hours and hours of jamming.
Without a strong melodic sensibility , you won’t have anything to set your guitar solo apart from every other solo out there.
These five elements are also a great way of approaching any new guitar solo that you’d like to learn.
And they are what we will focus on developing in your playing over the course of this series. So let’s get started.
Guitar solo lessons for beginners, you need: a guitar, a metronome and a guitar pick
Now before we get into the theoretical elements of lead guitar solos , it’s important that we make sure that you’re physically able to execute the concepts that I’m going to teach you over the course of this series.
So let’s start off with some warmup advice and five simple exercises that you can incorporate into your daily practice schedule that will help you build strength, stamina, dexterity, and muscle memory in both your picking and fretting hands, as well as the synchronization between them.
For general advice on correct and effective guitar practice, refer to this how to practice guitar post.
Warmup
It’s a good idea to stretch out your fingers before starting on the following exercises to avoid injuries.
There is no question about it.
Playing a guitar is work.
It uses muscles and actually burns calories. The human body is a wonderful mechanism.
One of the reasons for our success (biologically-speaking) is that we are not specialized for anything in particular.
We are a Jack of all trades, and Master of none.
So, to that effect, our bodies are a series of compromises.
The muscles in particular, are capable of instant, rapid action, but it comes at the price of stretched fibers, micro-lesions, and such.
The muscles are also capable of sustained output over considerable amounts of time, but they must be warmed up and stretched first .
Warming up and stretching means you won’t have to cut practice short because of sore or stressed muscles.
Warmup starts before you ever touch your guitar.
You need to pre-stretch the muscles in your hands, wrist, arms, shoulders and back.
This gets more important as you get older, trust me. Here is what you should do:
Loose your fingers
Start by loosening your fingers .
Slowly make fists, then release them. Do that 10 times. Next, using your left hand, grab your right thumb and move it gently in circles, not so big as to cause pain, but enough to gently stretch the muscles and ligaments.
Repeat for each finger.
Next, switch to your right hand, and do the left hand.
Finish by interlacing your fingers together, both thumbs up and palms facing you, and gently move your hands to your chest, stretching the fingers backwards as you do so.
Next, while keeping the fingers interlaced, rotate the hands until the palms are facing away from you, thumbs down, and move your hands out as far as you can without causing pain.
Relax the wrists
Next, we do the wrists.
Relax your hands, and extend your arms out in front of you.
Move your hands gently up and down at the wrists, as if you were slowly waving goodbye.
After 10 times or so, switch to moving the hands side-to-side at the wrists.
After 10 times, rotate the wrists in a complete circle, first clockwise about 10 times, then counter-clockwise 10 times.
Loose the forearms
The next step is to loosen the forearms by extending your arms straight out at shoulder level, hands relaxed and palms down.
Now slowly bend at the elbow and bring your forearms towards your face, without moving your upper arms, sort of like a reverse curl in weight-lifting.
Once they are all the way in, rotate the hands to palms facing you, and return the forearms to the original position.
Do this 10 times, then reverse the hand positions and do it 10 more times.
To loosen the upper arms, let them hang at your sides naturally, then raise them forward up above your shoulders, and lower them again.
Do this 10 times. Now, do the same thing to the sides, 10 times.
Relax the shoulders
To loosen the shoulders, simply rotate them 10 times forward, then 10 times to the rear.
To loosen the back, just bend forward at the waist and do a toe-touch, then return to the starting position.
Then bend backwards at the waist as far as you can without moving your hips, and return to the starting position.
Do this 10 times.
Finish by gently massaging your hands, your forearms, upper arms, and shoulders.
Now, you should feel loose, and ready to start your exercises.
Basic Right Hand Exercises
Exercise 1: Down Strokes on one string
 Get into a comfortable position and start playing a series of
eighth-note
down strokes on your low E string
, at a tempo that’s comfortable to you. Do this for a full
three
minutes.
And remember, don’t try to set your metronome at a super high tempo from the get go.
The point here isn’t to try to play as fast as you can, but to play as steadily as you can.
Exercise 2: Alternate Picking on one string
Follow Exercise 1 by playing a series of eighth-notes, at the same tempo, but this time using alternate picking (For those of you who aren't familiar with the term, alternate picking is when you play using alternating down strokes and up strokes).
Do this for a full three minutes as well.
And as with Exercise 1, remember to focus more on being able to play clean, consistent notes at a steady tempo rather than trying to play super fast from the start.
Also when using alternative picking it’s important to make sure that both your down strokes and up strokes have a similar dynamic and attack .
These two exercises might seem simple enough at first glance, but I’ve noticed a lot of beginner guitarists have problems with being able to restrain themselves from the temptation of trying to play as fast as they can from the get-go.
You see, using a metronome isn’t some sort of a contest.
It’s not that important to be able to play faster than you could the day before.
It’s far more important to be able to be honest with yourself and stick to a consistent pace until you’re able to tackle these two exercises without any inkling of doubt; and then gradually up the pace.
Basic Left Hand Exercises
Exercise 3: hammer-ons and pull-offs
 For this exercise, we’ll be using a series of
legato hammer-ons and
pull-offs
involving various finger combinations of your fretting hand.
-
Hammer-on with the middle finger (1-2)
To start off, place the index finger of your fretting hand on the 5th fret of the 3rd string. Now hammer-on onto the 6th fret using your middle finger. Do this with much force as you can, while also making sure that you’re hitting the string cleanly. Keep doing this at a steady pace for 15 seconds. -
Hammer-on with the ring finger (1-3)
Next, without pausing, start playing a series of hammer-ons with your ring finger on the 7th fret for another 15 seconds. Then start playing similar hammer-ons with your pinky finger on the 8th fret. Your index finger should remain firmly rooted on the 5th fret throughout these steps. -
Hammer-on with the ring finger and middle finger pressed down (2-3)
Now, without stopping the exercise, press down your middle finger on the 6th fret and start hammering on the 7th fret with your ring finger for 15 seconds. And then move onto hammering on the 8th fret with your ring finger, while keeping your middle finger in place on the 6th fret. -
Hammer-on with the pinky finger and ring finger pressed down (3-4)
For the final step of the final step of the exercise, place your ring finger on the 7th fret and start hammering on the 8th fret with your pinky finger for a duration of 15 seconds.
Now some of you might find that you need to put in more effort to hammer-on and pull-off with your ring and pinky fingers, so it’s OK to hammer-on slower with these two fingers initially.
And once you’re able to consistently perform this exercise with all fingers for 15 second durations, you can start increasing the duration of each segment.
Basic Left hand-right hand Synchronization Exercises
Next let’s take a look at two really simple synchronization exercises which will help put together what you’ve developed with the previous three exercises.
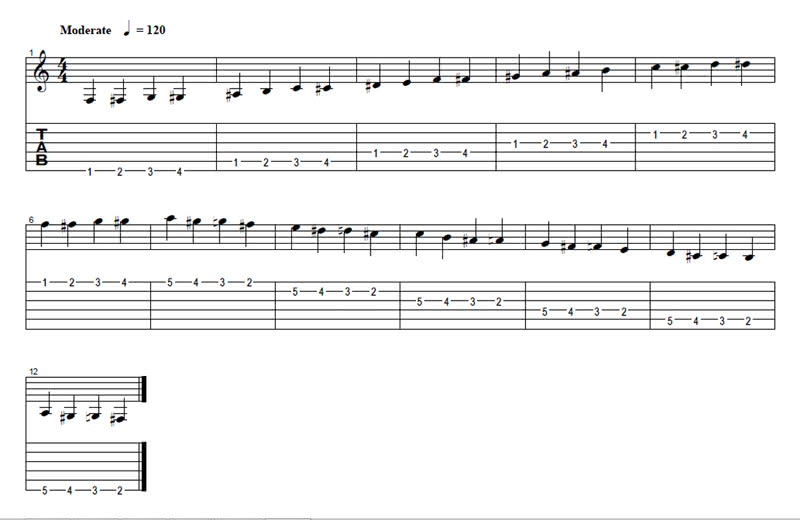
Exercise 4: 1-2-3-4 Synchronization
This exercise involves a series of simple 4 note runs played on all six strings.
To start off, play the notes on your 1st, 2nd, 3rd and 4th frets on your low E string using your index, middle, ring and pinky fingers, in that specific order.
Now repeat this sequence across all 6 strings.
Once you’ve reached the 4th fret of your high E string, start coming back up the fretboard by starting off on the 5th fret on the high E string played with your pinky finger.
Tabbed out this exercise looks like this:
Exercise 5: Alternating patterns
Exercise 5 – This exercise is a little more complicated than Exercise 4 and uses an alternating finger pattern to travel up and down the fretboard.
As opposed to the simple 1-2-3-4 pattern used in the earlier exercise, this exercise uses 4 different alternating patterns for each string.
When tabbed out for a single string this exercise looks like this:
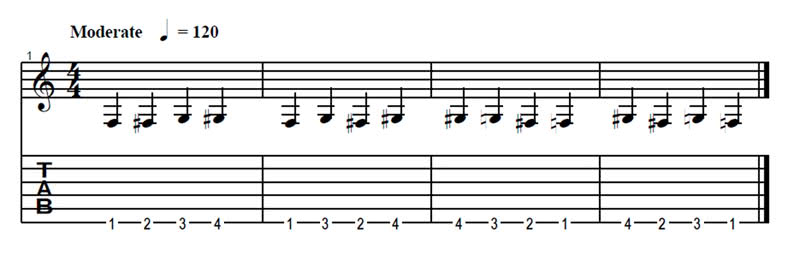
All you have to do is repeat this pattern down all 6 strings and back up again.
As with Exercise 1 and 2, it’s important to use a metronome when practicing these two exercises.
To start off with set the metronome to the slowest tempo that you’re able to play both exercises cleanly and fluidly at and work your way up from there.
Don’t get frustrated if your fingers feel weak and sluggish at the start.
Like any muscle in your body the muscles of your fretting hand will take time to become stronger and more agile.
Make these five exercises a part of your daily practice regime.
Even if you feel like you’ve mastered them at a significantly high speed, don’t stop.
Practice them every day.
Think of it like a daily gym session for your fingers.
Want to be a better lead guitarist? Learn the notes on the guitar
One of the most fundamental pieces of theory when it comes to the guitar is learning the notes across your fretboard.
You see, if you are to become a truly fluid solo guitarist, you need to be locate any and every note on your fretboard without having to spare a thought on the task.
Now this might seem like a daunting task for any beginner guitarist, but I’ve broken this down to easy steps that’ll make this process much easier in this guitar notes tutorial
The Pentatonic Scale
Now we’re going to start building your theoretical knowledge base with one of the most basic elements of guitar soloing – the pentatonic scale.
As the name suggests, a pentatonic scale is a musical scale with five notes per octave , as opposed to say a heptatonic or seven note scale.
Now the great thing about the pentatonic scale is that it sounds "in tune" with almost any chord change in a particular key.
For example, if you are playing in the key of A minor, any note of the A minor pentatonic scale will sound “good” over any chord in the key of A minor.
The pentatonic scale shapes are also incredibly easy to memorize because they each only have two notes per string , so you can pretty much start making music using them from the get-go.
First off, let’s take a look at the 5 shapes of the A minor pentatonic scale:

Now trying to learn all 5 shapes can feel a little daunting at first glance, so let’s break it down step by step.
Step 1 – Start playing the 1st shape (starting on the 5th fret) using alternate picking.
Remember the goal here isn’t to just play up and down the scale. Rather, it’s to memorize the scale with absolute certainty until you can play it with your eyes closed.
Step 2 – Pay attention to the notes that you’re playing in the 1st shape.
Now if you practiced learning the notes across all six strings, you should find this fairly easy.
Step 3 – Start playing the 2nd shape (starting on the 8th fret) using alternate picking.
Pay attention to the notes that you’re playing.
Step 4 – Notice how the 1st shape and the 2nd shape seem to fit together like two pieces of a jigsaw.
For example the following in the 1st position:
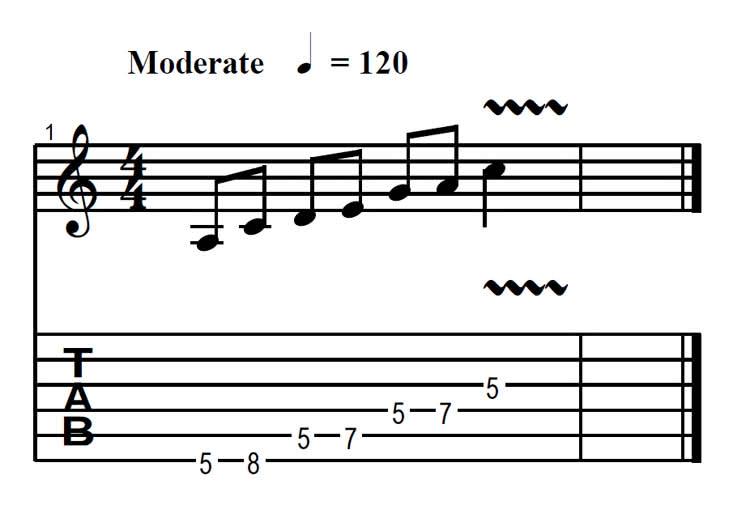
Is the same as the following in the 2nd position:
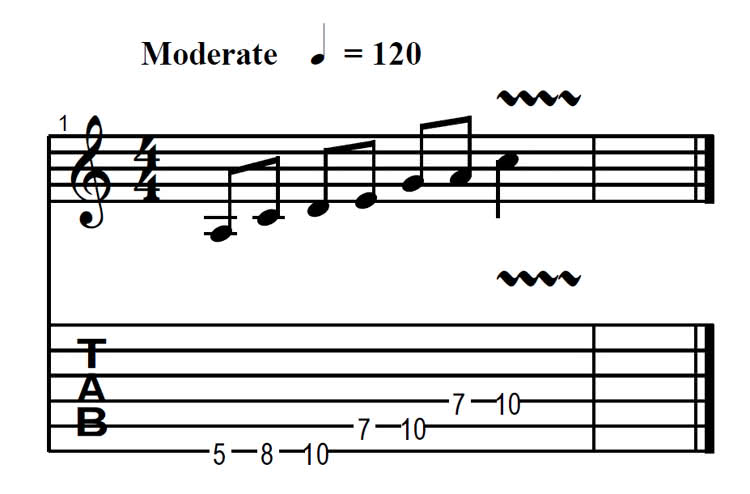
Step 5 – Start cross-referencing the notes of each shape until you’re able to visually see both shapes fitting together on the fretboard.
Step 6 – Repeat this process for positions 3, 4 and 5 until you have memorized them with absolute certainty.
You’ll also realize when learning these 5 positions that you can play the 5th position which starts on the 15th fret, starting from the 3rd fret as well.
Next let’s take a look at the 5 positions of the A major pentatonic scale:

Your next task for this lesson is to repeat Steps 1-6 for the A major pentatonic scale until you’ve got all 5 shapes memorized with absolute certainty.
You can also use my scale finder tool as a quick reference if you ever get lost or confused.
Meandering exercises
To wrap off this part, I’d like to give you a four-part homework assignment.
1) Simple Meandering
Part 1 - The first thing that I want you to practice doing this month is trying to “meander” for as long as you can across the fretboard while staying in one particular key – A minor pentatonic for instance.
Now remember, for the first step it isn’t important for your meandering to sound musical.
All I want you to focus on is to be able to keep playing for an extended period of time , using the entire fretboard, while staying in key.
The more you practice this, your hands and your brain will develop its own map of the fretboard which in time will help you play almost subconsciously without having to worry about what notes you should land on.
2) Meandering with a metronome
The next thing I want you to do is to repeat this same meandering exercise, but this time using a metronome .
As with the first step, the goal here isn’t to sound musical.
All I want you to work on is being able to play up and down the fretboard, in one particular key, along to the metronome.
3) Experiment with notes duration and pauses
Once you feel comfortable in your ability to randomly meander across the fretboard to the metronome, I want you to start thinking about your phrasing and note durations .
For example, if you were only playing 1/8 notes so far, I want you to experiment with adding notes of longer and shorter duration.
I also want you to start experimenting with adding pauses and breaks , all while playing to the metronome.
This is the point that you can start thinking about making your meandering sound more and more melodic.
If you like you can even find a suitable jam track on YouTube and try playing along with it.
4) Change Key
Once you’ve done this with both the A minor pentatonic and A major pentatonic scales, I want you to experiment with meandering across the fretboard on different keys .
This shouldn’t be too difficult if you’ve memorized your major and minor pentatonic shapes with absolute certainty.
For example, if you want to play in the key of G minor, all you have to do is move your 5 minor pentatonic shapes down two frets.
Now this might feel like a lot, but don’t be intimidated .
Once you get started you’ll realize how each concept sort of flows into the other.
And what’s more you’ll also start to feel some real excitement creep into you as you start hearing yourself actually sound like a solo guitarist!
So as always, practice hard , and I’ll see you soon!
Guitar soloing with the Blues Scale
Now we are going to expand upon that by adding a new note to the Pentatonic Scale, which teachers often refer to as the "Blue Note" , and give you some more techniques to work on, that will make your riffs much more dynamic .
What is the Blue Note
A Blue Note is simply a flatted 3rd, 5th, or 7th note (or raised 4th, depending on how you want to refer to it…), that adds a certain sonic dissonance, or "bluesy" sound to the music .
I could explain it with a lot of techno-babble, but the easiest way to understand Blue Notes is to listen to them in songs , and you’ll get a good feel for them.
Good examples of using Blue notes are The Thrill Is Gone-B. B. King , Why Don’t You Do Right?-Amy Irving, Sweet About Me-Gabriella Climi, and Stormy Weather-Lena Horne, Ella Fitzgerald , Etta James, or Billie Holiday. You can easily pick out the Blue Notes in these songs, because they almost sound like they don’t belong, and give an ‘edgy’ push to the song. Blue Notes are used in guitar riffs on all kinds of music, so it’s a good idea to get familiar with them.
The Blues Scale
So The blues scale is a six tone scale that we create by adding a flatted fifth note to either a major or minor pentatonic.
For example, let’s take a look at the A minor pentatonic scale; To turn this scale into a blues scale, all we have to do is add the note on the 6th fret on the 5th string (i.e. the flatted 5th note of the A minor pentatonic scale).
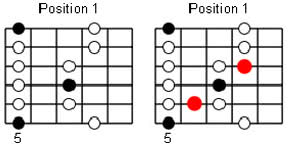
Now what I want you to do first here is to simply play up and down the scale until you really start to be aware of the difference in sound and feeling that the blue note adds.
The next thing that I want you to do is to then start meandering across the scale while experimenting with the blue note.
And remember, the point at the start isn’t to sound musical or melodic. The point is to simply get your mind and your hands used to including the blues note into the pentatonic scale.
When doing this you’ll notice that while the blue note works well in conjunction with other notes of the scale, it doesn’t sound too great as a target note.
For example, if you emphasize the blue note in your licks or passages, it can result in a diminished sound which doesn’t sound too pleasant. But if you use the blue note as a transitioning note between other notes in the scale, this can result in a pretty interesting sound.
Exercise 1: Add the Blue Note to the pentatonic scale
The first exercise that I want you to work on in this lesson is to take all 5 positions of the A minor pentatonic scale, and meander across them while adding the blue note.
Once you’re able to visualize and identify where the blues notes are across all five positions of the A minor pentatonic scale , I want you to then work on meandering across other minor pentatonic scales while adding the blue note.
This way, when you’re soloing in any given key, you’ll know where all your blue notes are with absolute certainty.
Next what we’re going to do is to learn where the blue note is added in a major pentatonic scale.
For example let’s take the first position of the A major pentatonic scale; the blue note in the major pentatonic scale ends up in a visually similar place to the minor pentatonic.
In the case of the A major pentatonic scale , it’s the note on the 3rd fret of the 5th string. This is also called a raised 2nd or a flatted 3rd.
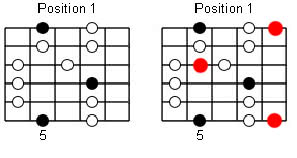
Exercise #2: Meandering with the Blues Scale
The second exercise that I want you to work on for this lesson is to first meander across the 5 positions of the A major pentatonic scale, while incorporating the blue note into your passages.
And remember, the point here isn’t to just add the blue note here and there, but to memorize with absolute certainty where the blue note is located in all 5 positions of the scale across the fretboard.
Once you feel confident that you can point out all the blue notes in all 5 positions of the A major pentatonic scale, I want you to move onto meandering across other major pentatonic scales while adding the blue note.
Combining the major and minor pentatonic scales
The next thing that we’re going to touch on in this lesson is an interesting little concept that involves combining the minor and major pentatonic scales.
Now the great thing about the minor pentatonic scale is that it can be used in a thousand different ways to express different emotions and feelings in a particular solo or lick.
But the problem with it is that it always has that dark, classical, minor pentatonic sound, which can sometimes get a bit boring if you don’t color it with something fresh every now and then.
And one of the best ways to go about doing this is by combining various notes of the minor pentatonic scale with notes from the major pentatonic scale.
So let’s start off by taking the 1st position of the A minor pentatonic and the 1st position of the A major pentatonic, both which start on the 5th fret of the 6th string.
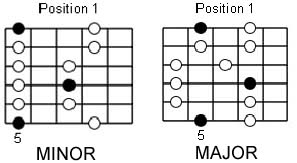
Now to give you an idea of what this “combining” sounds like, let’s just look at the notes on the last two strings.
In the minor pentatonic we’re playing the notes on the 5th and 8th frets while in the major pentatonic we’re playing the notes on the 5th and 7th frets.
So to start off let’s just try combining these four notes by playing the notes on the 5th and 7th frets on the 2nd string and the 5th and 8th notes on the 1st string.
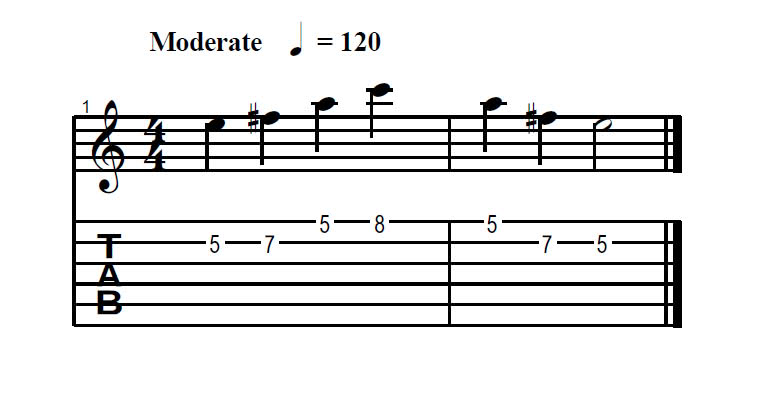
You’ll immediately notice how this lends to a much more interesting sound than if we were to simply play using the minor or major pentatonic scale.
Exercise #3: Ascending and descending patterns
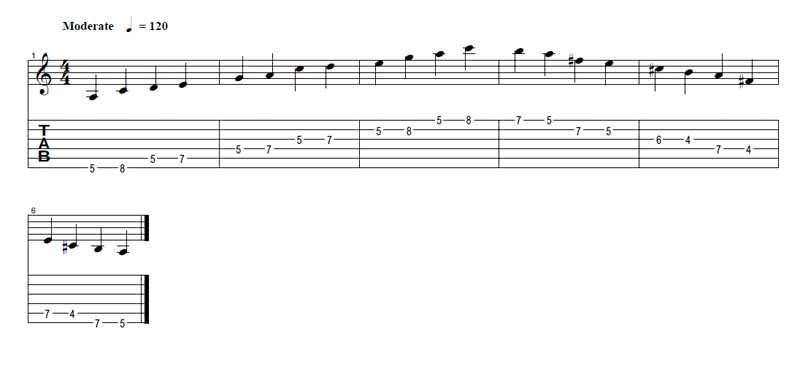
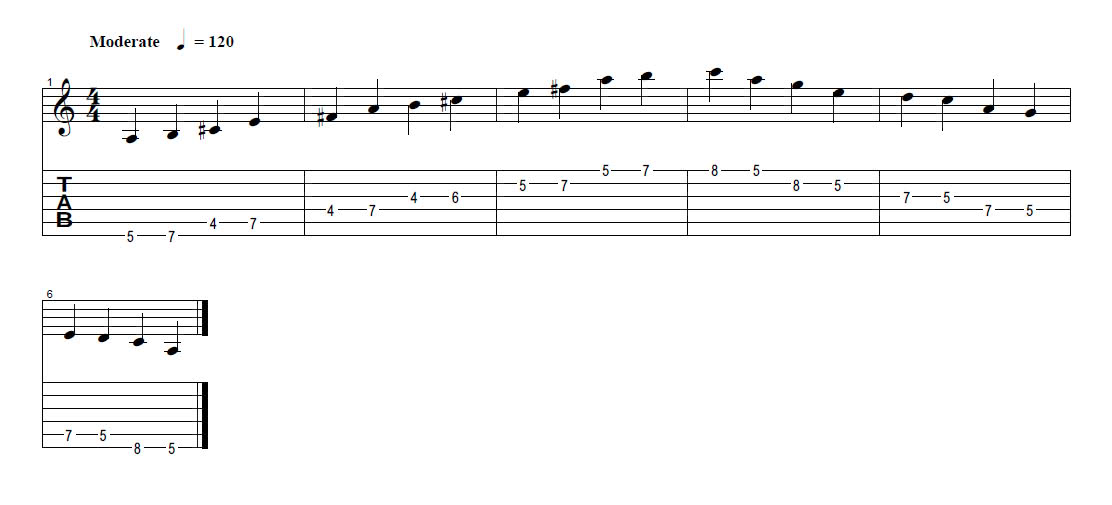
The third exercise that I would like you to work on for this lesson is to practice ascending and descending using the minor and major pentatonic scales, in an alternating pattern for 5 minutes each.
So for example, for 5 minutes practice ascending with the minor pentatonic and descending with the major pentatonic:
And then for 5 minutes practice ascending with the major pentatonic and descending with the minor pentatonic:
Exercise #4: Combining positions
For the first part of this exercise what I want you to do is to practice meandering combining the 1st position of the A minor pentatonic and 2nd position of the A major pentatonic .
When doing this, you’ll start to really hear and feel how different using this type of hybrid scale is as opposed to simple using the minor or major pentatonic scale.
Once you’re able to meander comfortably in this position while combining notes from both the major and minor pentatonic, I want you to do the same thing in all the other positions of the scales and finally across the fretboard. Do this to a metronome , while using pauses and stops, to create more melodic passages.
The point of this exercise is to make you familiar with smoothly switching between notes from the minor pentatonic and the major pentatonic, while also improving your intuition of when to use notes from the minor pentatonic and when to use notes from the major pentatonic.
Improve your expression, touch and feeling
Another thing that I want you to start working on with this exercise is to start incorporating various techniques like string bending, string skipping, hammer-ons and pull-offs in your meandering.
Now all of this might seem like a lot of knowledge to absorb in one lesson, but I just want you to remember that there’s no rush.
In fact, feel free to go back to any of the earlier lessons if you feel like you still haven’t mastered a certain area of knowledge before returning to this lesson.
And when you really start internalizing these concepts you’ll realize that you’re able to view your fretboard in multiple visual layers .
For example, in the first layer you should be able to see all the notes across your fretboard and in the second layer you should be able to visualize all the minor pentatonic and major pentatonic scale positions across the fretboard.
And then in the next visual layer you should be able to see where your blue notes are located, and etc. etc.
Hammer-Ons, Pull-Offs and Vibrato
Hammer-Ons, Pull-Offs and Vibrato are all important techniques to learn if you ever want to play leads, or be able to embellish your music, even when just strumming chords.
These techniques are used in just about every type of guitar music there is.
To get a clean-sounding Hammer-On, you need to develop the right ‘snap’ and force to get a solid, clean tone. Don’t worry. This comes with practice.
A Pull-Off is just the opposite of a Hammer-On, and they are used together frequently.
To get a clean Pull-Off, you just pull slightly down on the string and ‘flick’ it with your fingertip as you raise your finger off the string.
Again, it comes with practice. One of the best ways I know of to practice these together is to Hammer-On on the G on the 6th string, and then immediately Pull-Off to the open E, 6th string, and repeat it.
You can go back and forth between those two notes forever, without ever touching the string with your right hand at all.
When you do it fast, you’ll notice that this creates a ‘trill’ between the two notes, and allows you to make the notes much faster than you could ever do trying to play them individually with a pick. Now you know how guitar gurus like Stevie Ray Vaughan, and Angus Young get those screaming, powerful lead riffs. With some practice, you’ll be doing it, too.
Bending
Bending a note is simply pulling down or up on a string while you fret the note, in order to slide it sharp, then back down again to the original note, sort of like a steel guitar slide.
Vibrato
Vibrato is simply a variation of bending technique in which you bend the note ever so slightly, then return it to the original pitch, and repeat it rapidly to create a wavy-sounding dynamic. It’s a lot easier to do it than it is to explain .
It takes a little time to do, so it is usually added at the end of a line, or phrase. Vibrato adds incredible depth and character to your leads, and it is something you definitely want to learn.
Sliding
Sliding into and out of notes is also an important technique that you will use a lot. The best way to make a clean slide is not to rush it .
These techniques only work when they fit the music.
Going Beyond the Pentatonic Scale
So far we’ve touched on a lot of the basics of guitar soloing and we’ve worked on building a visual mind-map of sorts of your fretboard. And if you’ve been following this tutorial closely and more importantly if you’ve been applying yourself to the exercises in each lesson, you should by now be have a good knowledge of Pentatonic and Blues scales.
And by now you should also have a basic feel for moving around the fretboard in a specific key, to a metronome, while paying attention to your phrasing and melodic sensibility.
If you feel like you’re not as confident in any one of these areas, I’d suggest that you take a little more time to master them with absolute certainty.
After all, when it comes to guitar, it’s much harder to unlearn bad habits than it is to learn new ones.
Expanding the major and minor pentatonic
In today’s installment I want to talk about expanding the major and minor pentatonic scales to create the diatonic scale, or as most of you might know it, the “do re mi fa so la ti” scale.
So let’s start off by looking at the 5th position of the A minor pentatonic scale (diagrams created with the guitar scales finder tool )

Now if you're fluent in your pentatonic scale knowledge , by this point you should know that the notes that we play in the A minor pentatonic scale (A C D E G) are the same as the notes in the C major pentatonic.
And you’ll also notice that the 4th position of the C major pentatonic scale is identical to the 5th position of the A minor pentatonic scale.

Whether the scale sounds more in the key of A minor or more in the key of C major depends solely on the notes that we choose to emphasize when soloing in this pattern.
For example, if we were soloing over a jam track in the key of A minor, we’d emphasize more on the A note in the scale.
Now to expand this scale into a diatonic scale, let’s first add the notes visualized with a yellow circle:

What we’ve done here from a major pentatonic perspective is simply added the 4th and 7th notes to create a diatonic scale.
Likewise, if we were to treat this scale as A minor by starting on the A note, what we’re doing is simply adding the 6th and 9th notes to the scale.

The spread fingering shape: 3 Notes Per String Patterns
The second thing that I want to touch on in this lesson is what we refer to as the “spread fingering shape”.
Let’s first take a look at the C major scale in a spread finger shape:

This same C major scale played using a "box shape" would look like this:

Now while the box shapes are great for navigating the fretboard, there are several advantages to familiarizing yourself with this spread fingering shapes:
- Because you’re playing 3 notes per string, it’s much easier to speed things up when soloing
- The visual symmetry of the scale makes it much easier to memorize – the pattern of notes are the same on each the 6th and 5th, 4th and 3rd and 2nd and 1st strings.
- It’s much easier to visualize your scale degrees with this shape
Exercise 1: Meandering across the Major Scale
The exercise I want you to work on now is to meander across the C major scale to a C major jam track.
While doing this I want you to really focus and get a feel of how the various scale degrees (that is the I, II, III, IV, V, VI and VII notes) sound when played over specific chords in the progression.
You see, when it comes to playing truly great guitar solos knowing all these scales and simply playing up and down them is pointless.
What’s more important is to develop an intuition on how to play using various intervals between the scale degrees.
Understanding Modes
The last area of knowledge that I want to touch on in this series is an extremely useful area of music theory called " modes " (here a tool specifically conceived to help you understand modes on guitar .)
A lot of guitarists tend to have trouble understanding what modes are because teachers sometimes tend to overcomplicate this specific area of knowledge, so I’m going to try and keep things as simple as I can.
To start off with, let’s take the C major scale.
Now for those of you who don’t know, when playing in the key of C major we have 3 major chords, 3 minor chords and 1 diminished chord.
And whenever we are in a major key, the I, IV and V scale degrees are always major, the ii, iii and vi scale degrees are minor and the vii chord is a diminished.
So in the key of C major, the 7 chords corresponding to our 7 scale degrees would be:
- I – C major
- ii – D minor
- iii - E minor
- IV – F major
- V – G major
- vi – A minor
- And vii – B diminished
Now if we were to look at a typical verse-chord progression in the key of C major, we could go:
- A minor (vi) – F major (IV) – G major (V) for the verse
- C major (I) – G major (V) – A minor (vi) – F major (IV).
Here, in simple terms, we would say that in the verse we’re playing in the key of A minor and that in the chorus we’re playing in the key of C major.
But in reality what we’re doing is constantly playing in the key of C while emphasizing different chords.
So a mode is simply a way of referencing which chord or scale degree of a particular key we’re emphasizing.
For example, in the earlier example, we would say that we’re playing in C Ionian for the chorus and A Aeolian for the verse.
Likewise, there are seven modes of any given major key that we can use to reference which chord or scale degree we’re emphasizing. They are:
- I – Ionian
- ii – Dorian
- iii – Phyrigianv
- IV – Lydian
- V – Mixolydian
- vi – Aeolian
- vii – Locrian
So if someone were to say that they were playing in E Phrygian , what they actually mean is that they’re emphasizing on the III degree or E minor chord while playing in the key of C.
Likewise if someone were to say that they were playing in D Mixolydian , what they actually mean is that they’re emphasizing the V degree or D dominant chord while playing in the key of G.
Exercise 2: Familiarize with the 7 Modes
The second exercise that I would like you to work on for this lesson is to familiarize yourself with the seven modes and being able to quickly recognize which key someone is playing in when they call out a specific mode.
For example if someone were to tell you that they were playing in E Mixolydian, you need to be able to quickly figure out that what they mean is that they’re emphasizing the E major or V chord/scale degree while playing in the key of A minor.
Exercise 3: Meandering with the 7 Modes
The 4th and final exercise that I’d like you to work on for this lesson is to get a feel for meandering using various modes.
Step 1 – Practice and memorize the 7 spread fingering positions of any major key. You can start off with the G major scale and you can use the scale finder tool to familiarize yourself with each seven possible shapes of the scale.
When doing this pay particular attention to the 7 scale degrees of the scale and corresponding chords.
Step 2 – Pick a mode that you’d like to play in and a simple chord progression to meander over.
For example, if you were to play in A Dorian (key of G) a simple chord progression that you could play over could be Am – Em – G – Am .
When meandering over this chord progression work on emphasizing the A notes on the G major scale.
The first exercise that I want you to work on this week is to meander over a simple jam track , either in the key of C major or A minor and experiment with adding these notes to your pentatonic, or shifting the patterns.
You’ll notice how different the sound is from when you simply play using the pentatonic scale.
You might also notice that sometimes adding these two notes and playing through the entire diatonic scale can sometimes sound a little too straightforward and melodic, so what I really want you to work on is to get a feel of when to add these notes and when to stay away from them.
Scales Ebook
A good starting point that you can check out is my free guitar scale eBook which has many guitar scales and arpeggio patterns , with various fingering shapes, that you can use to bolster your theoretical knowledge of the fretboard.
If you are already a free member of this site , you can download the ebook from your personal download area as usual (you should have received the link in your welcome email).
Conclusion: How do you get to Carnegie Hall?
And that brings us to a close in this Lead Guitar Tutorial .
I hope that this post has inspired you to explore the amazing world of guitar soloing and that it’s given you a strong foundation of the basic concepts, theories and techniques required to start composing your own solos.
But as always remember, mastering the guitar is a never-ending journey and this is just a tiny starting point.
So go seek out as much knowledge as you can and work hard every day on expanding your theoretical knowledge, technical ability and melodic sensibilities.
All the great techniques in the world will do you no good unless you practice.
I’m reminded of the story of the couple that became lost looking for Carnegie Hall, where they had concert tickets.
They saw a guy carrying a guitar and thought for sure he would know the directions. They went up to him and asked
"How do you get to Carnegie Hall from here?"
He answered
"Practice, man. Lots of practice…"
There is no substitute for practice .
And don’t be afraid to jam with others.
Some of the best things I’ve ever learned on guitar were from playing with other guitarists.
That's all!
To stay updated on new content, subscribe to the free newsletter (you'll also get access to the download area with lots of reference pdfs)